什么是K8s admission controller
admission controllers可以对api请求进行校验和变更;整个API请求的流程如下:
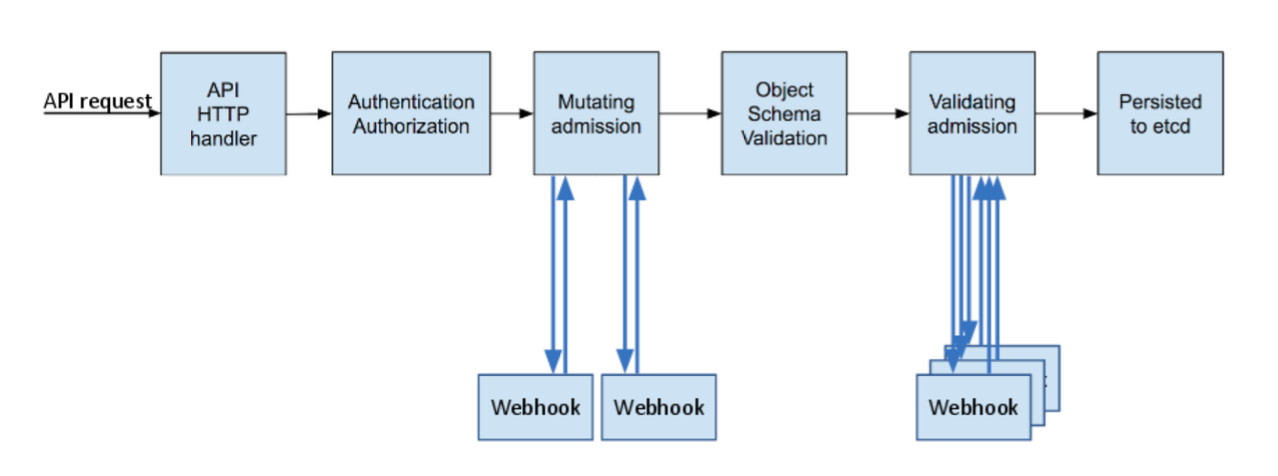
k8s里面有许多的 admission controllers,在这么多的admission controllers当中有两个比较特殊的,提供了扩展的能力
ValidatingAdmissionWebhooks:对请求进行校验:安全、参数信息、资源限制等,对请求进行拒绝操作;MutatingAdmissionWebhooks:可以对请求的参数进行变更,这个作用非常的大,可以对一个pod进行注入操作;
演示案例
使用大概流程如下:
-
用户可以自行编写
admission controller webhooks, -
编译打包成镜像
-
做成
Deployment,service进行发布
此时k8s cluster当中就有了一个apiserver的监听,后续的pod创建的时候,就可以进行validate和mutate;
官方提供了一个 安例,已经准备好了deploy.sh脚本,直接使用即可;不过还需要有一些前置的操作
校验参数配置是否正常,若没有打开插件,需要进行配置;
# kubectl get pod   -n kube-system  kube-apiserver-ops-pre-4-175 -o yaml | grep enable-admission
    - --enable-admission-plugins=NodeRestriction
修改api-server配置
 ## vim /etc/kubernetes/manifests/kube-apiserver.yaml
 --enable-admission-plugins=NodeRestriction,MutatingAdmissionWebhook,ValidatingAdmissionWebhook
重建apiserver
# kubectl delete pod   -n kube-system  kube-apiserver-ops-pre-4-175
 # kubectl get pods kube-apiserver-ops-pre-4-175 -n kube-system -o yaml | grep enable-admission-plugins
    - --enable-admission-plugins=NodeRestriction,MutatingAdmissionWebhook,ValidatingAdmissionWebhook
校验apiserver是否开启了admission的api
# kubectl api-versions |grep admission
admissionregistration.k8s.io/v1
admissionregistration.k8s.io/v1beta1
操作
配置环境变量
export KUBECONFIG=/root/.kube/config
下载工程,并deploy.sh
git clone  https://github.com/stackrox/admission-controller-webhook-demo.git

# ./admission-controller-webhook-demo/deploy.sh
Generating TLS keys ...
Generating a 2048 bit RSA private key
........................+++
....+++
writing new private key to 'ca.key'
-----
Generating RSA private key, 2048 bit long modulus
..........................................................................................................+++
..........................................................+++
e is 65537 (0x10001)
Signature ok
subject=/CN=webhook-server.webhook-demo.svc
Getting CA Private Key
Creating Kubernetes objects ...
namespace/webhook-demo created
secret/webhook-server-tls created
deployment.apps/webhook-server created
service/webhook-server created
在demo当中有三个pod的配置,这些pod的配置对pod的两个属性runAsUser、runAsNonRoot进行了变更,所以我们观察这两个属性即可;
这三个pod创建时会被admission controller webhook监听,然后对原本的busybox的属性进行变更操作;
func applySecurityDefaults(req *v1beta1.AdmissionRequest) ([]patchOperation, error) {
	......
	// Retrieve the `runAsNonRoot` and `runAsUser` values.
	var runAsNonRoot *bool
	var runAsUser *int64
	if pod.Spec.SecurityContext != nil {
		runAsNonRoot = pod.Spec.SecurityContext.RunAsNonRoot
		runAsUser = pod.Spec.SecurityContext.RunAsUser
	}

	// Create patch operations to apply sensible defaults, if those options are not set explicitly.
	var patches []patchOperation
	if runAsNonRoot == nil {
		patches = append(patches, patchOperation{
			Op:    "add",
			Path:  "/spec/securityContext/runAsNonRoot",
			// The value must not be true if runAsUser is set to 0, as otherwise we would create a conflicting
			// configuration ourselves.
			Value: runAsUser == nil || *runAsUser != 0,
		})

		if runAsUser == nil {
			patches = append(patches, patchOperation{
				Op:    "add",
				Path:  "/spec/securityContext/runAsUser",
				Value: 1234,
			})
		}
	} else if *runAsNonRoot == true && (runAsUser != nil && *runAsUser == 0) {
		// Make sure that the settings are not contradictory, and fail the object creation if they are.
		return nil, errors.New("runAsNonRoot specified, but runAsUser set to 0 (the root user)")
	}

	return , nil
}
- 创建
pod-with-defaults.yaml,由于其runAsUser、runAsNonRoot为空,所以会被设置为1234和true
✗ kubectl get pod/pod-with-defaults  -o=jsonpath='{.spec.securityContext}'
map[runAsNonRoot:true runAsUser:1234]

✗ kubectl logs pod-with-defaults  busybox
I am running as user 1234
- 创建
pod-with-override.yaml,配置里面指定了runAsNonRoot: false,由于没有设置runAsUser,并且没有被webhook所处理,所以user为0
✗ kubectl get pod/pod-with-override  -o=jsonpath='{.spec.securityContext}'
map[runAsNonRoot:false]

 ✗ kubectl logs pod-with-override busybox
I am running as user 0
- 创建
pod-with-conflict.yaml,将runAsNonRoot设置为true,且runAsUser设置为1234,打印出当前的user
✗ kubectl get pod/pod-with-conflict  -o=jsonpath='{.spec.securityContext}'
map[runAsNonRoot:true runAsUser:1234

✗ kubectl logs pod-with-conflict   busybox
I am running as user 1234
- 在
webhook当中还有一个异常场景,可以验证一下,创建一个pod-with-exception.yaml,修改配置如下:
apiVersion: v1
kind: Pod
metadata:
  name: pod-with-exception
  labels:
    app: pod-with-exception
spec:
  restartPolicy: OnFailure
  securityContext:
    runAsNonRoot: true
    ## 指定runAsUser为0
    runAsUser: 0
  containers:
    - name: busybox
      image: busybox
      command: ["sh", "-c", "echo I am running as user $(id -u)"]
在创建的时候会报如下的错误:
✗ kubectl create -f examples/pod-with-exception.yaml

Error from server: error when creating "examples/pod-with-exception.yaml": admission webhook "webhook-server.webhook-demo.svc" denied the request: runAsNonRoot specified, but runAsUser set to 0 (the root user)
在创建过程当中可以查看webhook-server的log
✗ kubectl logs -n webhook-demo webhook-server-7668f9d76-t95kk
2021/01/29 02:13:43 Handling webhook request ...
2021/01/29 02:13:43 Webhook request handled successfully
开发
开发不是很麻烦,大概流程如下:
- 启动一个服务,实现
/mutate、validate的api接口 - 对应的请求处理函数的入参为
req *v1beta1.AdmissionRequest,可以取pod,可以取对应的属性 - 对属性进行校验、变更